


Gua Sha has become a go-to ritual for those wanting to bring a little more calm and care into their skincare routine. But if you are new to it, knowing exactly how to use a Gua Sha tool step by step can feel a little overwhelming at first.
The good news is that it is simple once you understand the basics. With the right technique, Gua Sha can become an easy and enjoyable ritual that helps you slow down, support facial massage, and make the most of your skincare products.
In this guide, we will walk through how to use a Gua Sha tool step by step, including how to prepare your skin, how to hold the tool, and the best way to move it across different areas of the face.
What is a Gua Sha tool?
A Gua Sha tool is a smooth-edged facial massage tool, often made from natural stone, designed to glide gently across the skin. It is commonly used as part of a skincare ritual to help massage the face, encourage a moment of pause, and support a more mindful beauty routine.
Different shapes and edges are designed to suit different parts of the face, including the jawline, cheekbones, under-eye area, and forehead.
Before you begin
Before using your Gua Sha tool, it is important to prepare your skin properly. Never use Gua Sha on dry skin, as the tool needs slip to move comfortably and gently.
Step 1: Start with clean skin
Cleanse your face so you are working on fresh, makeup-free skin.
Step 2: Apply a facial oil or serum
Apply a few drops of facial oil or a generously layered serum to help the tool glide smoothly. This helps avoid dragging the skin and makes the ritual feel far more comfortable.
Step 3: Have your Gua Sha tool ready
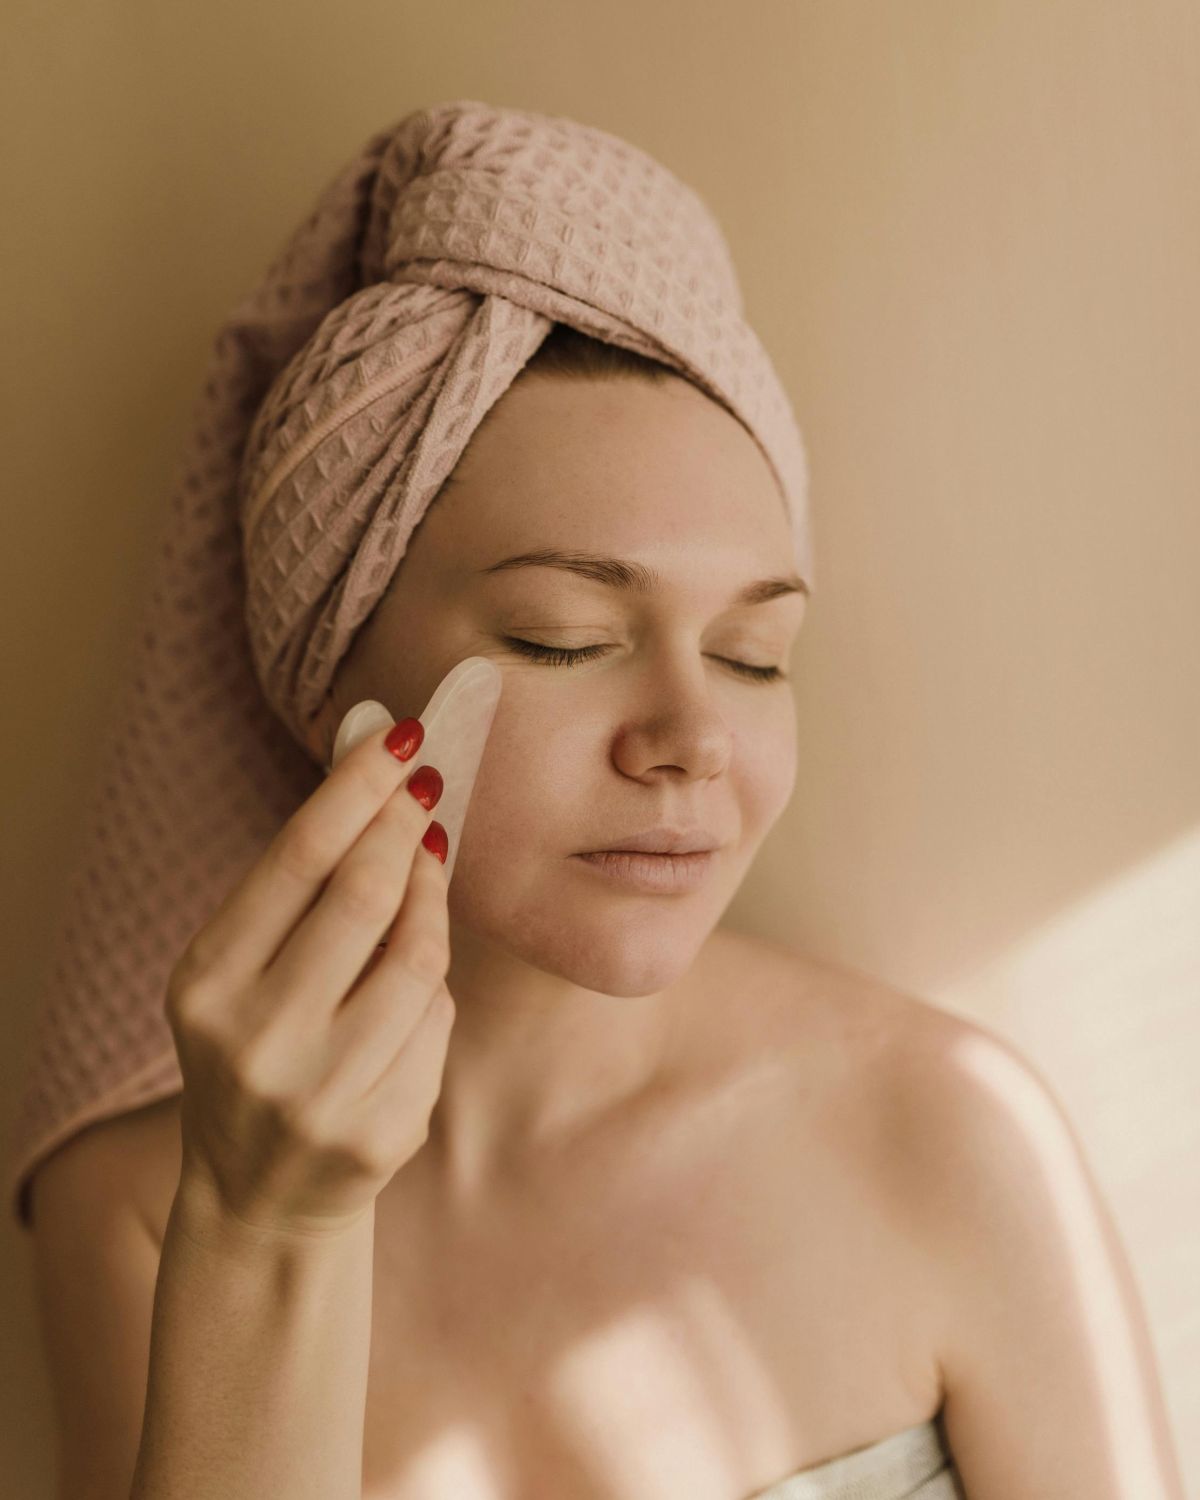
Hold the tool so that the flatter side can sit softly against the skin. In most cases, you want the tool at a fairly flat angle rather than upright.
How to use a Gua Sha tool step by step
When using a Gua Sha tool, always work with gentle pressure and sweep outwards and upwards. Repeat each movement around 3 to 5 times before moving to the next area.
1. Start at the neck
Begin at the base of the neck and glide the tool upwards towards the jawline. This is a gentle way to begin the ritual and helps set the direction for the rest of your movements.
2. Move to the jawline
Place the tool at the centre of the chin and glide it along the jawline towards the ear. Use the curved edge if your tool has one, as this often fits neatly around the jaw.
3. Sweep across the cheeks
Starting beside the mouth or nose, glide the tool outward across the cheek towards the ear. This area often feels especially satisfying and is one of the easiest places to begin if you are new to Gua Sha.
4. Use light pressure under the eyes
For the under-eye area, use the gentlest pressure and a smaller edge of the tool. Start near the inner corner and glide outward towards the temple. The skin here is delicate, so keep your movements slow and light.
5. Glide over the brow bone
Place the tool near the inner brow and move outward towards the temple. This step can feel especially calming if you carry tension around the eyes or forehead.
6. Work across the forehead
Start in the centre of the forehead and glide outward towards the temples. You can also work upwards from the brows towards the hairline, depending on the shape of your tool and what feels most natural.
How much pressure should you use?
One of the most important parts of learning how to use a Gua Sha tool step by step is understanding pressure. More pressure is not better.
Your Gua Sha tool should glide gently over the skin, not scrape it. The aim is a smooth, calming massage that feels supportive and relaxing. If your skin looks very red or feels irritated, you are likely pressing too hard or using too little product underneath.
How often should you use a Gua Sha tool?
You do not need a long routine for Gua Sha to feel worthwhile. Even a few minutes can make it feel like a meaningful pause in the day.
Many people use a Gua Sha tool:
-
in the morning as part of their skincare routine
-
in the evening to wind down
-
a few times a week
-
daily, if it suits their skin and routine
Consistency tends to matter more than length. A short ritual you return to regularly is often more realistic than a long routine you rarely do.
Common mistakes to avoid
If you are new to Gua Sha, these are the most common mistakes:
Using it on dry skin
Always use a serum or facial oil so the tool can glide properly.
Holding the tool too upright
Keep it flatter against the face for a gentler, smoother movement.
Pressing too hard
Gua Sha should feel calming and controlled, not harsh.
Rushing the ritual
The benefit of Gua Sha is not only in the movement itself, but also in the act of slowing down.
A simple daily ritual
If you are wondering how to use a Gua Sha tool step by step in real life, the answer is to keep it simple. Cleanse, apply your serum or oil, and spend a few minutes moving gently across the neck, jawline, cheeks, under-eyes, brows, and forehead.
It does not need to feel complicated. Like many good rituals, it works best when it feels easy to return to.
Final thoughts
Learning how to use a Gua Sha tool step by step is less about perfection and more about creating a ritual that feels calming, intuitive, and sustainable. With the right preparation and gentle technique, Gua Sha can become a simple way to bring more intention into your skincare routine.
If you are ready to begin, explore our collection of Gua Sha tools and find the shape and stone that feels right for your ritual.
Leave a comment
All comments are moderated before being published.
This site is protected by hCaptcha and the hCaptcha Privacy Policy and Terms of Service apply.